 PhotoDeckHelp Center
Using my own domain: step-by-step guide
You can set up your PhotoDeck website under the address / URL (domain name) of your choice. For example, www.alexsmithphotography.com or archive.alexsmithphotography.com. When properly set up, your whole website will be under your custom domain, and the photodeck.com domain will not appear at all.
No domain transfer is usually required. You will merely point your existing DNS configuration to PhotoDeck servers for your website.
Since PhotoDeck does not have access to the configuration for your domain, you need to configure it with the company that manages your domain (e.g. GoDaddy, Moniker, Network Solutions, etc…). It is usually the same company you have purchased the domain from.
Preliminary step: Purchase or get control over your domain
If you don’t own a domain name yet, purchase one from an independent provider. We recommend ovh.com. GoDaddy is also a popular alternative.
If you already own a domain purchased from the same company that provided your previous website, you must transfer your domain to an independent or specialized domain name provider. (PhotoDeck does not offer domain hosting, and it is best to host your domain separately from your website).
When your domain is under your account with a neutral domain name provider, you’re good to go!
PhotoDeck does not provide email services. If you wish to use email with your domain, the company that hosts your domain name is likely to offer such service.
STEP 1: Get configuration details for your domain
- In your PhotoDeck admin space, go to: My website / Setup / Name & URL
- Activate the option to use your own domain, enter your website URL (for example
www.alexsmithphotography.com) and click the Check configuration button (but do not hit Save yet).
This will reveal the DNS records that you need to add/edit in the admin interface provided by your domain provider.
STEP 2: Configure your domain
- In a separate browser tab, log onto the administration panel provided by the company that manages your DNS
- If your DNS host allows it, start by adding a web redirect from your domain apex (e.g. “alexsmithphotography.com” without “www”) to the hostname you will use for your PhotoDeck website (for example “https://www.alexsmithphotography.com”), using a “visible” redirection. This way, visitors not typing in the “www” part will still be properly directed to your website. Different DNS hosts offer this feature in different ways, please contact your DNS host support if you need help!
- Look for the “DNS records” page, sometimes also called “Advanced DNS”, “DNS zone”, “zone records” or “zone file”
- Add/edit the records exactly as shown in your PhotoDeck interface by copy-pasting them.
- Then proceed to STEP 3.
Your domain provider’s support team can probably do this step for you for free. You can copy-paste the full table shown in your PhotoDeck account and send it to them - also tell them if you’d like a redirection from the non-www version to https://www…
Q: What is your server’s IP address?
A: You shouldn’t need it, unless your domain host does not offer the basic options we recommend using (in which case changing host might be a good idea). Our primary IP addresses might change at any time without notice -- that is why it is important that you stay as close as possible to our recommendations.
If you really don’t have a choice, use 54.36.204.21 and 91.134.231.21.
Example: OVH
- Find the DNS settings for your domain in the OVH admin space
- Under DNS Zone, delete the www.mydomain.com row and recreate it with a CNAME type:
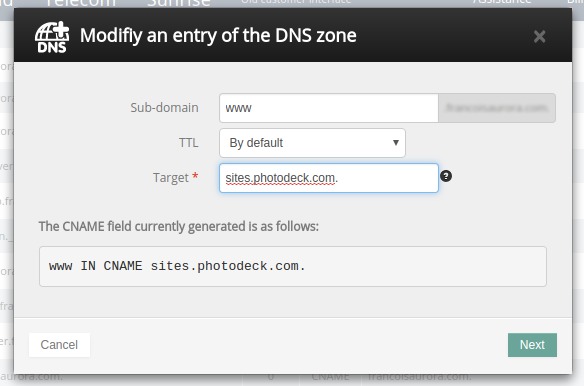
- OVH special: remove any TXT row for www.mydomain.com as they otherwise will interfere with your configuration
- Under Redirection, have mydomain.com redirect to http://www.mydomain.com
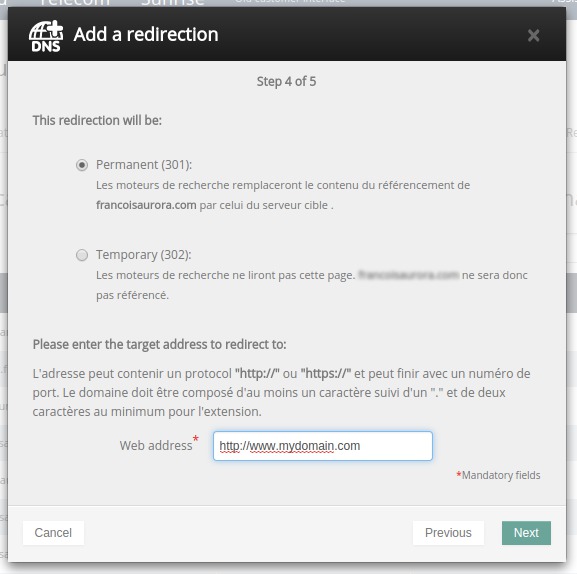
STEP 3: apply the new URL to your PhotoDeck website
- Go back to the PhotoDeck tab, and re-check the configuration. The domain configuration change might take a few minutes to be effective.
- When the configuration table shows that the domain is correctly configured, click Save to confirm the connection of your URL to your PhotoDeck website. It then replaces your default .photodeck.com URL. The SSL certificate for HTTPS secure connections will be automatically installed within a few hours.
- If possible, adjust the contact email address to use one under the same domain.
STEP 4: updating payment integrations and manual links
- If you use Stripe as a payment provider, update in your Stripe account the URL for the webhook that notifies your website of successful payments, as shown on the Stripe configuration page in PhotoDeck.
- If you have manually added links in custom pages, for example if you have built a custom splash page with an ENTER link, verify that they still work and update them if necessary.
FAQ
Do I need to purchase an SSL certificate for my domain?
No. A free SSL certificate is automatically installed for your website within a few hours of connecting your domain. If visitors see a certificate warning during that short window, wait for the installation to complete and reload the page.
Visitors typing my domain without “www” don’t reach my website or get a security warning
Make sure you have set up (at your domain host) a redirect from your domain apex (e.g.
mydomain.com) to the hostname you connected (e.g.https://www.mydomain.com), as described in STEP 2. PhotoDeck can only host the subdomain connected to your website (e.g. “www”). The SSL security for the redirection is provided by your domain host, so please contact them if a security warning appears when typing your domain without “www”.